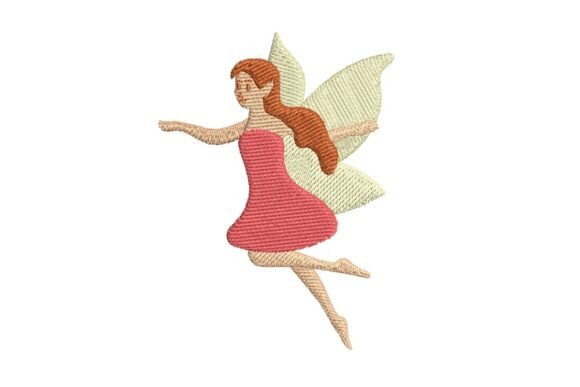
Red Hair Fairy Embroidery Design
A Whimsy That Stitches Well—Or Doesn’t
Let’s be real: not every fairy design holds up when you load it into your machine and stitch it onto a soft cotton tote bag for a client’s birthday gift. I tested the Red Hair Fairy Embroidery Design on three fabric types—midweight cotton twill, brushed poly-cotton sweatshirt fleece, and lightweight linen—and watched how it behaved under needle and thread. First impression? It’s sweet, yes—but more importantly, it’s intentional. The pose is gentle, arms slightly lifted as if holding stardust; the red hair flows in soft, layered satin stitches rather than jagged zigzags. No forced sparkle, no over-engineered wings—it breathes like a real embroidery file meant for actual making, not just digital browsing.
Where This Design Finds Its Magic (and Its Limits)
The Red Hair Fairy Embroidery Design shines brightest on items where charm matters more than durability claims: baby onesies, nursery pillow covers, tea towels for a whimsical kitchen boutique, or embroidered patches sewn onto denim jackets for craft fairs. I stitched it onto a cream-colored organic cotton tote—no backing, just tear-away stabilizer—and the result felt handmade, not mass-produced. Customers notice that difference. One Etsy buyer messaged me saying, “It looked even better in person than in your mockup”—and that’s the quiet win of a well-balanced machine embroidery design.
But here’s what I’d flag before you commit: this isn’t a design for dense, high-coverage work. The wings use delicate fill stitch with open negative space—not ideal for stretchy knits or thin jersey without heavy cutaway stabilizer. On a curved surface like a dad cap, the lower hem of the dress tends to pucker unless you hoop carefully and reduce tension slightly. And while the red hair reads beautifully on light fabric, it fades into visual noise on charcoal or navy unless you switch to high-contrast thread (think burnt orange or deep rust instead of true red).
Real-World Fit: From Sweatshirt to Small Shop Shelf
- Custom apparel: Works best on relaxed-fit sweatshirts and crewneck tees—not performance fabrics or moisture-wicking blends.
- Baby embroidery: Soft edges and moderate stitch density make it safe for sensitive skin, but avoid placing near seams or hems where stitching might rub.
- Embroidered patch: Clean outlines and balanced proportions mean it presses flat and sews on smoothly—ideal for iron-on or sew-on boutique patches.
- Holiday embroidery: Paired with subtle gold thread and a tiny sprig of greenery in the corner, it becomes a quietly magical Christmas or solstice gift—not kitschy, not generic.
- Etsy seller & small shop product: It elevates a plain tea towel or pillow cover from “nice” to “I need this for my storybook-themed nursery.” That emotional resonance translates directly to cart adds.
What Your Customers Actually See (and Feel)
People don’t buy embroidery files—they buy the feeling a finished product gives them. When someone unwraps a personalized sweatshirt with the Red Hair Fairy Embroidery Design, they’re not thinking about stitch count. They’re thinking, “This was made *for* me.” That warmth comes from clarity of line, thoughtful spacing, and a sense of motion—even in stillness. The fairy’s hair curls just enough to suggest wind, her wings tilt subtly, and her face avoids the uncanny valley of over-digitized expressions. That subtlety builds trust. It tells your buyer: “This creator pays attention.”
That said—don’t assume it’ll auto-translate across all branding. If your craft business leans minimalist or modern-sleek, this design may feel tonally mismatched unless softened with neutral thread palettes and clean layout. But for makers rooted in Fairy Tales storytelling, cottagecore aesthetics, or gentle fantasy, it slots right in like a missing puzzle piece.
Designer Notes You’ll Actually Use
- Test first—on scrap fabric matching your final project’s weight and drape. Not just once, but twice: once with your usual stabilizer, once with a lighter version to gauge density.
- Check thread color contrast before hooping. Red hair on tan linen looks warm and rich; on oatmeal terry cloth, it can dull. Swap to coral or terracotta if needed.
- Review stitch density manually in your software—if the wings or dress hem look overly dense, consider reducing fill angle or adding slight underlay. Better to adjust now than re-hoop later.
- Confirm hoop size. This design fits comfortably in a 4x4 hoop, but pushing into 5x7 opens up room for subtle background flourishes—just don’t add them unless your machine handles multi-step jumps cleanly.
- Inspect small details: the fairy’s eyes are tiny satin ovals—not running stitch dots. If those vanish mid-stitch, your needle may be dull or your top tension too tight.
- Mock it in black and white before finalizing. Does the shape hold up without color cues? Yes—with this design, it does.
- Verify licensing. Since it’s labeled for commercial embroidery, confirm whether resale of finished products is permitted—and whether digital redistribution (e.g., bundling in an embroidery subscription) is allowed. When in doubt, contact the designer.
Final Thought: A Design That Earns Its Place
The Red Hair Fairy Embroidery Design doesn’t shout. It doesn’t need glitter or glow-in-the-dark thread to make its case. It earns its place on a handmade product by being legible at 12 inches, tender at 4 inches, and consistent across fabric types. It supports your voice as a maker—not overrides it. Whether you’re stitching a one-off personalized gift or building a cohesive line of Embroidery-based Fairy Tales goods, this file behaves like a collaborator, not a compromise. Just remember: even the most charming fairy needs good stabilizer, sharp needles, and your own thoughtful judgment to truly take flight.